Technical Info on Chain + Sprockets and chain conversions
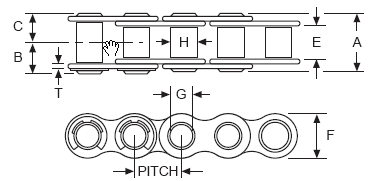
Chain Size & Pitch
Below table
contains chain pitch, roller width (E), Chain Height (F) and roller diameter (H) for
common motorcycle chain types in mm and inch:
Chain
size / type |
Chain pitch
mm |
Roller Width (E)
mm |
Chain*
Height (F)
mm |
Roller Diam (H)
mm |
Chain pitch inch |
Roller Width (E) inch |
Chain*
Height
(F)
inch |
|
415 |
12.7 |
4.76 |
12.2 |
7.77 |
1/2 |
3/16 |
0.472 |
|
420 |
12.7 |
6.35 |
12.2 |
7.77 |
1/2 |
1/4 |
0.472 |
|
428 |
12.7 |
7.94 |
12.2 |
8.51 |
1/2 |
5/16 |
0.472 |
|
520 |
15.875 |
6.35 |
15.0 |
10.30 |
5/8 |
1/4 |
0.591 |
|
525 |
15.875 |
7.94 |
15.0 |
10.30 |
5/8 |
5/16 |
0.591 |
|
530 |
15.875 |
9.53 |
15.0 |
10.30 |
5/8 |
3/8 |
0.591 |
|
532 |
15.875 |
9.53 |
15.0 |
11.10 |
5/8 |
3/8 |
0.591 |
|
630 |
19.05 |
9.53 |
18.1 |
11.91 |
3/4 |
3/8 |
0.712 |
* = Varies slightly between manufacturers, pls check your chain.
Although a 520, 525 and 530 chain have the same pitch, the roller width is different and
therefore: You
should never mix
a chain and sprockets of different types
!
Chain Maintenance
Proper chain maintenance
is essential for safety, maximum performance and a long chain & sprocket
life. The interval at which a chain needs maintenance depends on the
type (sealed or not) and the way it is used and is mostly described in
the User Manual. To be on the safe side, have a look at your chain after
each ride and maintain it after every 500 km or about 300 miles. But
like I said, these intervals differ per bike so check your manual !
Lubrication
Although most modern chains are sealed and pre-lubricated, the external
of the chain (rollers and side blades) need to be lubricated (very)
regularly. This will also keep the chain clean and corrosion free. Use
the intervals mentioned above but when driving in wet or extremely dusty
conditions, lubricate more often ! Also lubricate the chain while it is
still 'hot', that is following a ride.
Cleaning
Although there are many products to clean a chain, Tsubaki
recommends the use of a "moisture displacement lubricant" to clean
chains and to not use any dissolvent, petrol, diesel, detergents,
steam-cleaner or coarse brush because it will damage the chain. In fact
it will damage the seals which will cause the chain to wear very fast.
How to Lubricate/Clean
To spread the lubricant over the chain, it must be rotated while
lubricating. Therefore if you have a center stand use that, if not, get
some help an tilt the bike on the jiffy so the rear wheel is off the
floor.
Because using a spray
always causes a 'cloud of lubricant' that will descend on your rim and
tire so maybe it is a good idea to protect them using an old newspaper
or piece of cardboard. Try to aim the spray between the side blades and
the rollers like illustrated below, first the left side. Spray and
rotate the rear wheel at least 3 complete revolutions. Then do the same
on the right side of the chain.
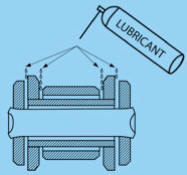
After
spraying, you need to wipe off the excessive lubricant using a dry and
clean cloth.
Adjusting chain tension
Both a to tight chain or a to loose chain will wear out faster or
even cause danger so it is important to keep the chain at the right
tension. This right tension will differ per motorcycle and is often
described in the Owner Manual. Most common method for checking is
placing the bike on the center stand when available or on a paddock
stand or tilted on a jiffy and measure the slack of the chain in the
middle like illustrated below.
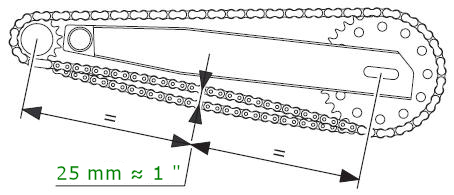
Turn the
rear wheel slowly until you find the position where chain is tightest.
Push the chain up pressing with a finger at mid-length of swing arm. The
lower stretch of chain must have a slack of about 25 mm 1". The exact slack depends on the type of chain and length of the
swing arm and should be checked in your User manual. If not available,
the example above is a good average.
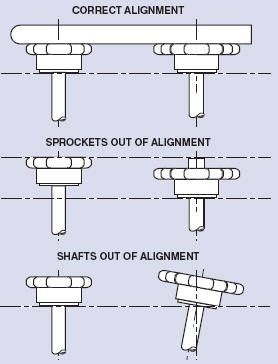
Sprocket Alignment
To prevent noise and fast wear of the chain, the sprockets must be
aligned in 2 direction:
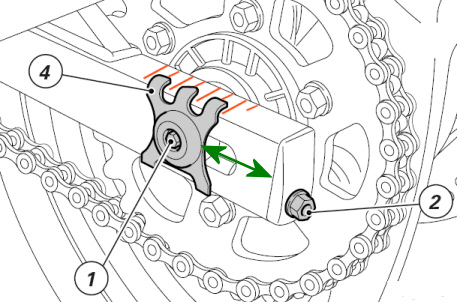
When the chain tension needs to be adjusted,
make sure that the rear sprocket is aligned with the front sprocket.
To adjust the tension and/or alignment:
Slacken the nut (1) of the wheel shaft, tighten (turn clockwise) or
slacken the screw (2) on either side of the swing arm equally to
increase or reduce chain tension. If you are slackening the chain, you
will have to push the wheel forward. Make sure you have adjusted to the
same setting marks (red) on both sides of the swing arm. Refer to
the position of the slider (4) on both sides.
If there are no marks on your swing arm you can
either create them your self or measure the distance of the slider to
the end of the swing arm (green arrow) on both sides and make sure they
are equal. This will ensure perfect wheel alignment and thus a perfect
sprocket alignment. If the rear wheel and sprocket is not aligned with
the front sprocket, both chain and sprockets will wear very fast.
Chain & Sprocket replacement
Does a
chain really "stretch"? The term "stretch" is misleading. A chain will
elongate when the pins and bushings wear down. This is due to poor
lubrication, under sizing and overloading of the chain. As the
components thin, the space between the pins and bushings increase, thus
making the chain longer than originally. For transmission chain, there
is almost no risk of fatigue failure when wear elongation is less than
or equal to 1.0 percent for O-ring chains.
For Non O-ring chains the
maximum wear limit is usually 2%.
A
direct measure of chain wear is the extension in excess of the nominal
length of the chain. Lay the chain on a flat surface and, after
anchoring it at one end, attach to the other end a turnbuckle and a
spring balance suitably anchored. Apply some tension load by means of
the turnbuckle.
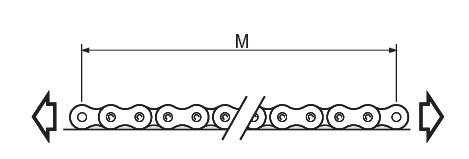
Of
course this is more easy with a 'broken' chain that has 2 ends but it is
also possible with an endless chain, just measure part of the chain and
count the # of measured links (as many as possible):
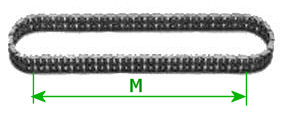
Measure
length ‘M’ in millimeters from which the percentage extension can
be obtained from the following formula:
M - (X
* P)
Percentage extension = -------------
Where X = # of pitches measured,
P = pitch (in mm for more accuracy)
(X
* P * 100)
As a general rule, the useful life of the chain is terminated and the
chain should be replaced when the percentage extension reaches
2 per cent.
520 Chain Conversion
A popular upgrade
is a so called 'chain conversion' what actually is replacing a 'big
heavy'
chain and sprockets by a 'small light' chain and sprockets. Most powerful
modern bikes come with a strong chain type like a 525, 530, 532 or even
bigger.
By replacing it by a smaller and lighter one like a 520 chain people hope
to gain acceleration.
The advantages of the 'conversion' are:
- lighter chain and
sprockets
- less unsprung
weight
- less rotating mass
The disadvantages are:
- weaker chain
- more chain wear
with danger of snapping
- hardly noticeable
performance differences
I often get questions
about what sprockets to buy when doing a chain conversion. As the number of sprocket teeth has got nothing to do with
say a 630 -> 520
chain conversion, you are only changing the type and sizes of chain (and sprockets, not the number of teeth), to keep your
current final drive ratio, you should buy sprockets with the current
amount of teeth. For size differences between all different chain types
see the tabel at the top of this page
If however at the same time you also want to
change your final drive to get some more low end torque you could change
your final drive ratio to achive that as you are already buying new
(diffentent type) sprockts anyway.
Personally I would not do it as you will probably not even notice the difference unless you are
a professional racing driver and you are able to replace your chain before every race. Just keep your the stock chain in good condition by cleaning and
lubricating it regularly. That saves you some money so you can go to the gym and loose some 'unsprung weight' your self.... ;-)
Sprocket Diameters
When changing sprockets
it is important to check if a bigger or smaller sprocket will fit on the
bike and if it will not cause issues.
When using a smaller sprocket,
especially on the front, the angle of the chain will change and the
chain might start touching the swing arm.
When using bigger
sprockets, also especially on the front, it is important to check if
there is enough room for the sprocket with the chain on it. The Gearing
Commander cannot determine the amount of room on your specific bike but
it can calculate the sprocket (pitch) diameter and more important the
total diameter of the sprocket with the chain or belt on it; the Chain-
or Belt-diameter.
When that is known, you can go to your bike and check
if a 'sprocket & chain' with that size can actualy be fitted to it. If in doubt
you could create a cardboard sprocket and place that on your
front-sprocket axle. Of course it would not have to have actual teeth
and have the outside diameter as the calculated Chain- or Belt-Diameter
(Cd or Bd). If that can be fitted with still some room to spare,
you should be Ok. Go to this additional
Help-Page on Sprocket
diameters for details on the calculated diameters.
Back to Gearing Commander
|